The bumper of your car is designed to take minor impacts, but that often means it’s the first part of your vehicle to suffer from unsightly paint transfer, scuffs, and scrapes. Whether it’s from a misjudged parking maneuver, a bump from another car, or an encounter with a rogue shopping cart, seeing foreign paint on your car bumper is a common and frustrating experience. The good news is that you can often remove paint transfer from your bumper yourself, especially from modern plastic bumper covers, without needing an expensive trip 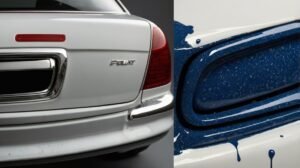 to the body shop. This guide will detail the best way to remove paint from your car bumper, covering techniques from gentle clay bar treatments to the careful use of rubbing compound, and explain how to get paint off while protecting your bumper’s original finish. We’ll equip you with the knowledge and steps to safely remove the paint and restore your bumper’s appearance.
Understanding Bumper Materials and Paint
Before attempting to remove paint from a car bumper, it’s essential to understand what you’re working with. Most modern cars feature bumpers made from durable plastics like polypropylene or TPO (Thermoplastic Olefin). These plastic bumper covers are then painted with specialized flexible bumper paint designed to adhere to the plastic and withstand minor flexing without cracking. This system typically includes:
- Adhesion Promoter/Primer: Applied to the raw plastic part to help the subsequent layers stick.
- Base Coat: The color layer of your bumper’s paint.
- Clear Coat: A protective transparent layer over the base coat that provides gloss, UV protection, and resistance to minor scratches.
When you see paint transfer on your bumper, it’s usually the paint from the other car or object sitting on top of your bumper’s clear coat. The goal is to remove this transferred paint without damaging your bumper’s clear coat or underlying paint.
Initial Assessment: What Kind of Damage Are We Dealing With?
Carefully examine the affected part of the bumper:
- Is it just paint transfer? Gently run your fingernail across the mark. If it feels raised or catches your nail, it’s likely paint transfer.
- Is there a scuff or gouge? If the impact was harder, it might have created a scuff (abrading the surface) or even a gouge (a deeper cut) into your bumper’s paint or the plastic itself. Removing the transferred paint won’t fix these deeper issues, which might require a repaint or even bumper repair.
- Is there a dent? Sometimes a paint transfer incident also results in a dent. While this guide focuses on paint removal, the dent would be a separate repair.
- Is your bumper’s paint damaged? If your bumper’s own paint is cracked or peeling beneath the transferred paint, the problem is more complex than simple paint transfer removal.
Safety First: Precautions Before You Begin on Your Bumper
Working on your car bumper, especially with chemicals or abrasive products, requires precaution:
- Ventilation: If using solvents like paint thinner or strong remover products, work in a well-ventilated area.
- Protective Gear: Wear gloves to protect your skin from detailing products and safety glasses to shield your eyes.
- Test in an Inconspicuous Area: This is CRUCIAL. Before applying any product to the visible damage, test it on a hidden small area of your bumper (e.g., the underside or an inner edge) to ensure it doesn’t react negatively with your flexible bumper paint or clear coat. Removing paint from plastic can be trickier than metal.
- Read Product Instructions: Always adhere to the manufacturer’s guidelines for any compound, polish, or chemical remover.
Methods to Remove Paint Transfer from Your Car Bumper
Always start with the less aggressive method first. This is the best way to get results while minimizing risk to your bumper’s paint.
Method 1: The Gentle Clean and Clay Bar Approach
Often, this is all you need for light paint transfer on your bumper.
- Thorough Wash:
- Start with a good car wash. Clean the affected part of the bumper thoroughly with car wash soap and water to remove loose dirt, grime, and debris. This prevents you from rubbing grit into the paint and causing more scratches.
- Rinse well and dry completely with a clean microfiber cloth.
- Try Clay / Use a Clay Bar:
- A detailing clay bar is excellent for lifting bonded surface contaminants, including light paint transfer, from your bumper’s clear coat.
- You’ll need a clay bar (available at an auto parts store) and a suitable lubricant (a quick detailer spray or specialized clay lube is recommended).
- How to use a clay bar on your bumper:
- Knead a piece of the clay bar until it’s soft and flat.
- Generously spray the lubricant onto the paint transfer area on the bumper and on the clay bar itself.
- With light pressure, gently glide the clay bar back and forth over the transferred paint. You’ll feel it ‘grab’ as it picks up the contaminant.
- Continue until the clay bar glides smoothly, indicating the foreign paint is being lifted.
- Fold and knead the clay bar frequently to expose a clean surface. If you drop it, discard it immediately.
- Wipe away any lubricant residue with a clean, damp cloth or fresh microfiber cloth.
- For many minor bumper scuffs with paint transfer, this method can effectively remove the paint.
Method 2: Specialized Paint Transfer Removers (e.g., Goo Gone Automotive, 3M Products)
If the clay bar isn’t enough, a dedicated paint transfer remover is the next step. Products like Goo Gone Automotive or certain 3M specialty adhesive removers are formulated to dissolve substances like transferred paint without harming most factory automotive paint finishes, including those on plastic bumpers.
- Test First: Always test on an inconspicuous small area of the bumper.
- Application: Apply the remover to a clean, soft cloth or microfiber cloth (do not spray directly onto the bumper unless instructed).
- Gentle Rubbing: Gently rub the affected area. The paint transfer should start to break down. Avoid aggressive rubbing which can abrade the clear coat.
- Wipe Clean: As the paint transfer loosens, wipe it away with a clean section of the cloth or a new one.
- Neutralize: Wash the treated area of the bumper with car soap and water to remove any chemical residue.
Many auto parts stores stock these products. Ensure the product explicitly states it’s safe for clear coats and plastic parts.
Method 3: Rubbing Compound and Polish (Manual Application for Bumpers)
For more stubborn paint transfer on your bumper, a mild abrasive like a rubbing compound or polish can be effective. These products work by gently leveling the transferred paint with your bumper’s clear coat.
- Choosing the Right Product:
- Polish: Less aggressive. Contains fine abrasives to remove very light scratches, swirl marks, and restore gloss. Start with this.
- Rubbing Compound: More abrasive than polish. Designed for more significant oxidation, deeper surface scratches, and more stubborn paint transfer. Popular choices include Meguiar’s Ultimate Compound or Turtle Wax Rubbing Compound. Use with caution on plastic bumpers as excessive pressure or overly abrasive compounds can dull or damage the flexible bumper paint.
- Manual Application Process for Bumpers:
- Start with Polish: Apply a small amount of car polish to a foam applicator pad or a clean microfiber cloth.
- Work in Small Sections: Rub the polish onto the paint transfer on the bumper using overlapping circular or straight back-and-forth motions. Use moderate, consistent light pressure. Do not let the product dry on the surface.
- Buff Off: Before it dries, buff the area with a clean, dry microfiber cloth to remove polish residue and inspect.
- Escalate to Compound if Needed: If polish alone doesn’t remove paint, cautiously move to a rubbing compound. Use the same technique, but be even more mindful of pressure. Check your progress frequently. You might see a slight haze after using a compound on the bumper; this is normal and will be addressed by polishing.
- Follow with Polish: After using any rubbing compound on your bumper, it is absolutely essential to follow up with a car polish. This refines the surface, removes any micro-marring or haze left by the compound, and restores a high gloss shine to the bumper’s clear coat.
- Clean Thoroughly: Wipe the bumper area clean to remove all product residue.
This manual method is often the best way to remove most common paint transfer from a front bumper or rear bumper scuff.
Method 4: Paint Thinner or Lacquer Thinner (Extreme Caution on Plastic Bumpers)
Using potent solvents like paint thinner or lacquer thinner on a plastic car bumper is highly risky and generally NOT recommended. These chemicals can easily soften, warp, or permanently damage the plastic bumper cover or its flexible bumper paint.
- AVOID IF POSSIBLE ON PLASTIC. If you are even considering this, you’ve likely exhausted safer options.
- Test Rigorously: If you must try, test on an extremely hidden, sacrificial part of the bumper. Many plastic bumpers will react very poorly.
- Minimal Application: Barely dampen a very small corner of a soft cloth.
- Quick, Gentle Wipes: Extremely quick, light wipes. The goal is to dissolve only the foreign paint.
- Immediate Neutralization: Instantly wipe with a clean, damp cloth with water, or a quick detailer to neutralize and remove any thinner residue. Do not let it dwell.
- If the transferred paint doesn’t lift almost immediately with no pressure, STOP. You will damage your bumper. Discussions on forums like the Southern Polyurethanes forum might mention thinners, but this is usually by professionals working on metal panels, not DIY on plastic bumpers.
Method 5: Machine Polishing on a Bumper
For larger areas of paint transfer on a bumper, or if manual rubbing is ineffective, machine polishing with a dual-action (DA) polisher can be an option.
- Care Required: Bumpers, especially those with complex curves, require careful machine polishing. The edges and contours are prone to “burn-through” (removing too much paint or clear coat) if not handled correctly.
- Equipment: Use a DA polisher (safer for beginners than rotary), appropriate foam pads (e.g., a light cutting or polishing pad for compound, a finishing pad for polish), and quality compound and polish.
- Technique: Use low speed settings, light pressure, and keep the machine moving. Don’t concentrate on one spot for too long, as heat can build up and potentially deform the plastic bumper.
- This is an advanced detail technique. If inexperienced, the risk of damaging your bumper’s paint is higher.
Method 6: Wet Sanding a Bumper (Expert Level / Pre-Repaint Only)
Wet sanding a plastic bumper is an extremely abrasive method and should only be undertaken by experienced individuals or as a preparatory step for a full repaint of the bumper.
- High Risk: Using fine grit sandpaper (e.g., 2000-3000 grit) can easily sand through the relatively thin clear coat and paint on a plastic bumper, exposing the primer or raw plastic.
- Procedure: If attempted, it requires constant lubricant (water with a drop of car soap), very light pressure, and an understanding that the area will require extensive multi-stage compounding and machine polishing afterward to restore any semblance of gloss.
- Generally, if paint transfer on your bumper is so severe that you’re considering wet sanding, it’s time to consult a professional body shop. They can properly assess if the bumper can be saved or if a respray is the more appropriate solution. They are equipped to handle urethane paints and proper surface preparation for plastic parts.
Special Considerations for Removing Paint from Plastic Bumpers
- Flexibility: Flexible bumper paint is designed to move with the plastic. Avoid overly aggressive techniques that could compromise this.
- Heat Sensitivity: Plastic deforms with heat. Avoid prolonged machine polishing in one spot or using heat guns in an attempt to soften paint (unless you are a professional with experience in plastic bumper repair).
- Chemical Sensitivity: Always test removers and solvents. What’s safe for metal might damage plastic.
- Texture: Some bumpers have textured plastic areas. These are very difficult to deal with if paint gets into the texture. Avoid abrasive compounds on textured plastic.
- Adhesion of Old Paint: If your bumper’s own old paint is peeling, trying to strip it with chemicals is a major undertaking and often leads to a worse mess. This usually requires professional preparation for a repaint.
After You Remove the Paint Transfer from Your Bumper: Essential Aftercare
Successfully removing the paint transfer is only part of the job.
- Clean Thoroughly: Ensure all remover, compound, or polish residue is completely removed from the bumper. A wipe-down with a panel prep spray or diluted Isopropyl Alcohol (IPA) can help.
- Apply Protection (Wax/Sealant): The removal process, especially if it involved compounds, will have stripped any existing wax or sealant from that part of the bumper. It’s crucial to reapply a good quality car wax or paint sealant. This protects the bumper’s clear coat, restores gloss, and makes future cleaning easier.
When to Call a Professional for Your Bumper
Sometimes, a DIY approach isn’t the best way to get the desired results or could risk more damage:
- Deep Gouges or Cracks in the Bumper: If the plastic bumper itself is cracked, deeply gouged, or if the paint transfer is accompanied by a significant dent, a body shop specializing in plastic bumper repair is needed.
- Paint Damage Beyond Transfer: If your bumper’s own paint is peeling or compromised beneath the transferred paint.
- Large or Severe Transfer: If a large part of the bumper is covered in heavy paint transfer.
- Textured Plastic Areas: If paint is embedded in textured plastic parts of the bumper.
- Lack of Confidence or Right Tools: If you’re not comfortable with the methods or don’t have the necessary detailing products or tools. A professional detailer can often remove paint transfer from a bumper quickly and safely.
- If you tried and it got worse: Sometimes, it’s best to stop and let an expert take over before causing irreparable damage that necessitates a full bumper respray.
Tools and Materials Checklist for Bumper Paint Removal:
- Car wash soap, mitt/sponge
- Clean buckets
- Microfiber cloths (several clean ones)
- Clay bar
- Clay lubricant (quick detailer spray)
- Specialized paint transfer remover (e.g., Goo Gone Automotive, 3M Specialty Adhesive Remover – check for plastic safety)
- Car polish (e.g., Meguiar’s Ultimate Polish)
- Rubbing compound (a mild one, e.g., Meguiar’s Ultimate Compound or Turtle Wax Rubbing Compound Fine Cut)
- Foam applicator pads
- Protective gloves
- Optional: Dual-action polisher and appropriate soft pads (use with caution on bumpers)
- Car wax or sealant
You can find most of these items at an auto parts store, a dedicated car detailing products supplier, or sometimes a well-stocked hardware store.
That Annoying Bumper Scrape You Got on Your Car on Saturday
Picture this: you’re washing your car on Saturday, and your heart sinks as you discover a fresh paint scrape across your previously pristine front bumper. It looks like paint from the other car has made itself at home. Before despairing, remember the steps in this guide. You can assess the damage, gather your supplies, and start with the gentlest method to remove paint, like a clay bar or a dedicated remover, before cautiously considering a light polish or rubbing compound specifically chosen for its suitability on automotive paint and plastic bumper covers.
Restoring Your Bumper’s Flawless Finish
Removing unwanted paint transfer from your car bumper is often achievable with a patient, methodical DIY approach. By understanding your bumper’s material, starting with the less aggressive techniques, and using the right tools and detailing products carefully, you can successfully remove foreign paint and avoid a costly trip to the body shop. Always prioritize safety and test products in an inconspicuous small area first. If the paint transfer is severe or accompanied by deeper damage like a gouge or dent, or if you’re unsure, consulting a professional detailer or body shop is the wisest course of action to ensure your bumper is restored correctly, potentially saving you from a more expensive repaint or respray down the line. With a little effort, that unsightly bumper blemish can become a distant memory.